Wednesday, October 26, 2011

Apple Coffee Cake "Muffins"

I say "muffins" because this is a true, super moist coffee cake, it's just shaped like a muffin. I like this recipe in muffin cups because then it becomes more portable!

This method I call my "modified muffin method". If you know the muffin method for baked goods, it's essentially all of the wet ingredients mixed together in one bowl, all the dry in another, then you combine the two. I, however, do not like to wash dishes. So I like to only use one bowl. I essentially combine all of the ingredients but the flour, then just stir the flour in. This is the method I use for coffee cake, cookies, quick breads, pancakes, and yes, muffins :)

One note: when prepping the pans, I suggest to spray the paper liners with non-stick spray. I know this sounds a little silly. But if you don't the topping will adhere to the liners and you'll be gnawing it off the paper with your teeth when you're eating these.

Preheat oven to 375

Topping:

1/4 cup light brown sugar, packed
2 tablespoons granulated white sugar
1/4 cup all purpose flour
1 teaspoon cinnamon
2 tablespoons butter, melted

Combine sugars, flour and cinnamon. Add melted butter and mix until well combined. Set aside.

Cake:

1/2 cup butter
1 medium gala apple, 1/4 inch diced (about 3/4 cup)
1/4 cup sour cream
1/4 cup apple cider
1/2 teaspoon vanilla
1/2 cup granulated white sugar
1/4 teaspoon salt
1/2 teaspoon baking powder
1 1/4 cup all purpose flour

Line 12 muffin pan with paper liners. Then spray inside of liners with non-stick spray.

Melt butter in a saucepan and add diced apple. Cook for one minute.
Transfer apples and butter to a mixing bowl. Add sour cream, cider, vanilla, sugar, salt, and baking powder one at a time, in that order. Mix in flour until just combined.

Using a 1/4 cup measuring cup, divide batter into muffin cups. (You will notice it divides perfectly) Top each muffin with a little over 1 tablespoon of the topping.

Bake at 375 for 20 minutes.

Allow to completely cool in pan before removing.


Machine Free Vanilla Bean Ice Cream

I love this recipe. It's easy and you don't need a machine to make ice cream at home! Yum!

First, I must address just a couple things. Although you don't need an ice cream machine, you will need one special tool. A fine mesh strainer. You can get a large one for $10, or a smaller one for like 5. Next, I must insist on Vanilla Bean Paste in this recipe. It really makes a difference. However, if you chose not to, you can substitute one tablespoon of extract or one halved and scraped vanilla bean. I freeze my ice cream in this gladware contat's about 9x13 in size) it's black and has a clear lid. I like it because it's shallow so the ice cream freezes quickly and evenly.

The first part of making ice cream consists of making an anglaise. You can make just the anglaise itself and use it as a sauce over chocolate torte, brownies, apple crisp, or you could even put some southern comfort in it for a little egg nog :)

Ingredients:

2 cups whole milk
1 cup granulated white sugar
6 egg yolks
1 tablespoon vanilla bean paste
2 cups heavy whipping cream

Whisk egg yolks with sugar and vanilla until pale yellow in color and thick (about a minute) Heat milk in a saucepan until slightly simmering. Whisk 1/2 cup of the hot milk into the eggs, then whisk all of the egg mixture into the milk in the saucepan. Switch to a wooden spoon and stir anglaise constantly. Cook on low heat for 3-4 minutes. The anglaise will start to boil and become thick. Remove from heat and strain through a fine strainer.

Chill uncovered in refrigerator for 2 hours, stirring every half hour.

When your custard is cool, whip the cream. You want the cream to be stiff. Stir half of whipped cream into anglaise with a rubber spatula. It will feel like it takes a while, so be patient. Use small circular motions. Stir/fold remaining whipped cream until just combined.

Pour into plastic container, cover, and freeze for a minimum of 5 hours.

*note* my ice cream is currently in the freezer, when it's done I'll snap a pic for you :)


Apple Cider Braised Pork Shoulder

This isn't necessarily a recipe as much as it is a method. This is how I make pork shoulder. You can pull it for bbq sandwiches, put it in beans, serve with grits, or my personal favorite- grilled cheese.

Simply rub the shoulder with some salt and pepper and sear it in a hot pan with a little olive oil. Sear on all sides, remove pork. Deglaze the pan with 1 cup of apple cider per 2 lbs of meat. Add the cider to the pork in whatever you will be braising it in. Either a crock pot on low or an oven set at 200 for 6-8 hours.

After the pork is done and you pull it, I like to dump a yeungling in it. Let the pork absorb. If you live in an area where you can't get yuengling (as I did a month ago) use a good amber beer.


Friday, October 21, 2011

Banana Nut Bread

This is the best recipe for banana bread that I have ever used. My mother, who had been using her own recipe since I can remember even switched to this one after she tried it.
Feel free to use whatever nuts you like. I like roasted almonds. Also, when buying nuts for some reason they are cheaper in the snack (or bulk foods aisle if your store has one) than in the baking aisle. The baking aisle is a rip off. :) I've obviously spent more time than I should wandering around grocery stores.
Feel free to replace nuts with chocolate chips, or to add chips and nuts.
I included a picture of the ripeness of banana I like to use. A little brown, a little black, and definitely no green in sight.
This recipe can easily be halved, as it does make 2 loaves or 24 muffins. The bread itself will look dark when you bake it, not to worry, it will taste great.
This is also a good time to use the non-stick spray that has flour in it. Works great for quick breads.

Oven: 350

3/4 cup butter, room temp
8 ounces cream cheese, room temp
2 cups granulated white sugar
2 eggs
2 teaspoons vanilla
3 cups all purpose flour
1 teaspoon baking powder
1/2 teaspoon baking soda
1 teaspoon salt
1 1/2 cups mashed bananas (about 4)
1 cup chopped nuts

Spray two 8x4 loaf pans or 24 muffin cups with non-stick baking spray.
With an electric mixer, beat cream cheese and butter until smooth. Add sugar and cream for 2 minutes. Add eggs and vanilla and cream until combined. Add flour, baking powder, baking soda and salt. Mix until just combined. Add mashed bananas and nuts and/or chips.
Divide batter into baking vessels. Bake bread for about an hour. Muffins for 25-30. You want a toothpick inserted in the middle to come out clean and dry.


Thursday, October 20, 2011

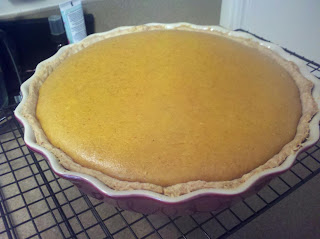
Pumpkin Pie

At first glance, this will look like pumpkin cheesecake because of the addition of mascarpone cheese. But it's not. The mascarpone just gives the pie a more custard-thick consistency. It's nothing like your typical grocery store pie, it's way better. Mascarpone is pricey, but it's worth it. You can always substitute regular cream cheese if you want, I've done it both ways and both are good, mascarpone is just better. *sidenote* if you've never purchased mascarpone before, it's in the specialty cheese fridge by the deli by the parmesan, not by the cream cheese.
I've written my pie crust recipe below, if you don't want to make it, just go to the store and buy a premade one. (I won't tell!)
One other note: this makes a little larger than your average sized pie. I have deep dish pie plates that I use for everything and I posted a picture of the pie plate I use below. It's Food Network brand from Kohls. I got it on sale for $5, and it was only $10 originally. If you use smaller pie dishes, this filling will actually fill 2 of them, so you'll need to double the crust recipe.
I also included a basic vanilla bean whipped cream for garnish. It has vanilla bean paste in it. If you haven't bought any yet.. you need to! :) You can find a link in my "A Note About Vanilla Bean Paste" post, or you can find 4 ounce bottles at sur la table or williams sonoma. Or yes, you can use vanilla from the grocery store :) Man, I'm a brat about vanilla aren't I?
Pie Crust:
1 cup all purpose flour
1/2 teaspoon salt
1/2 teaspoon baking powder
3 tablespoons vegetable shortening
3 tablespoons butter, cold and diced
2-3 tablespoons ice cold water
Mix the flour, salt and baking powder in a bowl. Cut the shortening and butter into the flour with a pastry blender, or fork, or your fingers (whatever you're most comfortable with) you want the butter and shortening to be the size of peas. With your hands, knead the dough while adding in the water, one tablespoon at a time, until the dough comes together.
Roll the crust out to fit your plate on a well floured, flat surface. Place the crust in the plate and pinch the top sides with your fingers. (Everyone pretty much knows how to do that I think)
Put the crust in the fridge to rest while you work on the filling.
Pumpkin Filling
8 ounces mascarpone cheese, at room temp
15 ounces canned pumpkin
1 cup granulated white sugar
1/2 teaspoon salt
2 large eggs
1/2 cup heavy cream
1/2 cup milk
1 teaspoon vanilla bean paste
1/2 teaspoon ground cinnamon
1 pinch nutmeg
1/4 teaspoon dry ground ginger
With your electric mixer, beat mascarpone until soft. Add pumpkin and sugar, beat until combined. Add remaining ingredients and mix well.
Bake at 350 for 60-70 minutes. The way you tell if a custard is done is to shake it. It should have a very little jiggle in the middle. It's better to have it a little overdone than a little underdone, so if you're nervous about taking it out, leave it in for a few more minutes.
Allow pie to cool on a wire rack until room temperature before refrigerating. This will allow the pie to finish setting. Chill for 4-6 hours or overnight if you like cold pumpkin pie.
Whipped Cream
1 1/2 cups heavy cream
2 tablespoons melted butter
1/4 cup powdered sugar
2 teaspoons vanilla bean paste
Whip cream and butter until .... well until it looks like whipped cream! Add sugar and vanilla and whip until combined. Add a little more sugar if you want it a little sweeter. The melted butter will help the cream to keep it's shape if it sits for more than a couple hours (fyi).
Did I forget to mention that this is NOT low fat?? :D happy baking!

Buffalo Chicken Mac and Cheese

The best mac and cheese recipe meets buffalo chicken!! So good.

If you want a simple mac and cheese, just make it without the chicken and use plain bread crumbs or shredded cheese to top.

This recipe makes enough for 4 people. You can easily double it, I just figured this would be the quantity most desired.

If you like blue cheese with your buffalo wings, you can add some blue cheese on top of the macaroni. I listed it in the recipe, though that variation is not pictured.

Cheese Sauce

3 tablespoons unsalted butter
3 tablespoons all purpose flour
1 teaspoon salt
1/2 teaspoon freshly ground black pepper
3 cups milk
12 ounces shredded cheddar cheese
1 teaspoon dijon mustard

Melt butter in a saucepan. Whish in flour, salt and pepper, cook for 1 minute. Add milk and bring to a boil. Once boiling, remove from heat and melt in cheese and mustard.

Mix cheese sauce with 1/2 lb macaroni noodles, boiled and well drained.

For the chicken:

Shred 8 oz cooked chicken breast (about 2 breasts) you can poach them or roast them, whichever way you like. Mix shredded chicken with Franks Red Hot Buffalo Wings sauce. Use amount that you feel comfortable. I use about 1/3 of the bottle.

For the topping:

1 tablespoon olive oil
1/2 packet dry ranch seasoning (about 2 tablespoons)
1/2 cup bread crumbs
OPTIONAL: 1/2 cup blue cheese crumbles

To assemble mac and cheese:

Preheat oven to 400

Spread bottom of a 9x13 pan with half the macaroni and cheese. Spread chicken evenly, then top with remaining half of macaroni. The layers will be pretty thin, so don't worry if chicken sticks out some. The chicken will stay more moist if you put it in the middle, it tends to dry out on top. Mix topping ingredients and sprinkle on top. If you're using blue cheese, put it under the bread crumb mixture.

Bake for 15-20 minutes.


Chili and Cornbread

In honor of how awful the weather is, I'm posting my chili recipe. It's going to look complicated.. but it's not. I have tons of dry spices and herbs, so I make my own Chili seasoning mix. But you can always buy the packet stuff if that's what you like. I personally always have these spices on hand, and totally understand that not everyone is as crazy as myself.

For a packet spice blend, I like McCormick. You will need 2 packets for the amount of chili this recipe makes.

This recipe will fill a 5 quart crock pot, so feel free to cut it in half if you're not super chili eaters.

First listed will be the spice blend, then the chili ingredients, and finally a cornbread recipe.

Also, in the recipe you will see that it simply says "2 lbs meat" this is simply because you can put any combination of meat you like in here and it's good. This chili base is so great in the fact that so many things are good in it. 1 lb of chicken with 1 lb of chorizo, 1 lb or ground beef with 1 lb of italian sausage, 1 lb of sausage with 1 lb of ground turkey, 2 lbs of leftover turkey breast, 2 lbs of diced chuck roast.... it goes on and on and on... Even if you don't care for beans, just leave the beans out and add another pound of meat, say bacon maybe?? :)

When you read the chili recipe you will think I am insane.. but yes.. chocolate. Just do it. It rounds out all the flavors and makes a huge difference. TRUST me on this one. If you know my brownie recipe, you know I like Hershey's Special Dark Bars.. guess what... I like them here too! For the beer I usually just use whatever I have, Corona, Coors, Yuengling. It's all good. Also, if you don't have/like/want beer, you may want to add a little chicken stock/ water instead.

Ok, this is the spice mix I like:

1 1/2 teaspoons garlic powder
1 1/2 teaspoons onion powder
1/2 teaspoon cayenne pepper
1 teaspoon paprika
1 tablespoon ground cumin
1 tablespoon chili powder
1 tablespoon dry oregano leaves
4 teaspoons salt
2 teaspoons freshly ground black pepper

Please note that the spice mix is a starting point, if you like it more spicy, add some hot sauce.. if you don't like heat at all, leave out the cayenne.

For the chili:

1 poblano pepper, finely diced
1 red bell pepper, diced
1 green bell pepper, diced
1 medium vidalia onion, diced
3 garlic cloves, minced
1- 4.25 ounce can diced green chilis
1- 29 ounce can tomato sauce
1-12 ounce can tomato paste
1-10 ounce can diced tomatoes with green chilis (Rotelle is a good brand)
2-15 ounce cans black beans, rinsed and drained
2 lbs meat of choice
1-12 ounce beer
2 ounces dark chocolate

In whatever pot you will be simmering your chili in (crock pot, soup pot...) open and empty your tomato sauce, tomato paste, diced green chilis, diced tomatoes, beans, beer and chocolate. Also add all of the spice mix. In a large saute pan, heat a small amount of olive oil and saute your peppers, onions and garlic until fragrant and soft. About 4-5 minutes. Add cooked peppers and onions to chili pot.
If you're using raw meat, brown it before adding to chili pot.

Allow to simmer for at least 4 hours. Serve with sour cream, hot sauce, shredded cheese, cornbread or whatever else you like.

Cornbread Recipe

1 cup all purpose flour
1 cup yellow cornmeal
1/4 cup granulated white sugar
1 teaspoon salt
1 tablespoon baking powder
1 cup milk
1/4 cup canola oil
1/4 cup honey
2 large eggs

Preheat oven to 400. Non stick spray an 8x8 pan, a 9x9, or 12 muffin pan.

Mix all dry ingredients in one bowl, and all the wet in another. Pour wet ingredients into dry and stir until combined. Pour into prepared pan.

Bake muffins for 15 minutes, panned bread for 20-25.

Pictured chili is chicken and chorizo.


No Bake Cookies

When I was a kid, we always had cookies in our lunch. My mother didn't always have the time to bake a whole batch- so she would make no-bakes. They are super duper easy.

Below I have written the original recipe flavored by chocolate and peanut butter and also the Nutella variation. You can use either crunchy or smooth peanut butter, I like smooth.. but that's just me.

Before you start making the cookies, prep where you will either drop them or pour them. If you want drop cookies, lay out some wax paper, parchment or aluminum foil. You will need to non-stick spray the foil if that's what you use. I will often times just pour the cookie batter into a parchment or aluminum foiled lined 9x13 pan and cut them once they're set into small bars. 

The Nutella bar variation is pictured below.

ORIGINAL No-Bake Cookies

2 cups granulated white sugar
1/4 cup cocoa powder
1/2 cup unsalted butter
1/2 cup milk
1 cup peanut butter
1 tablespoon vanilla
3 cups quick cooking oats

In a large saucepan bring the sugar, cocoa powder, butter and milk to a boil. Boil for 30 seconds. Add peanut butter and vanilla. Once the peanut butter is melted, add the oats.

Either drop cookies in desired amounts or pour into your 9x13 pan. Let set for an hour or so (it may take a little longer for the 9x13 depending on the temperature/ humidity of your house). You can always throw the cookies into the fridge for 15 minutes if you're getting impatient.

NUTELLA No-Bakes

2 cups granulated white sugar
1/2 cup butter
1/2 cup milk
1 cup Nutella
1 tablespoon vanilla
3 cups quick cooking oats

Bring the sugar, butter and milk to a boil. Boil for 30 seconds. Add the Nutella and vanilla. Once melted, add the oats.

Drop cookies onto prepared surface or into prepared pan. The Nutella cookies are a bit softer and take a little longer to set. Drop cookies about an hour, panned bar cookies about 2 hours.


Wednesday, October 19, 2011

Best, Best, Best Brownies

Brownies have been one of those things that have taken me a very, very long time to perfect. But I found, as with lots of my other recipes, that you have success when you combine traits of things that you like. Brownies are a perfect example. This recipe combines two distinct qualities of two very different types of brownie- tasteless yet wonderfully textured box mixes with flavorful yet usually too dense homemade mixes.

I have also worked on this recipe so it takes just a couple minutes longer than the box mix and only one bowl. A major downfall with a lot of the from scratch recipes is that they take expensive ingredients and require you to melt chocolate, separate eggs, and multiple bowls and tools.

A couple things: for the chocolate, I use those large Hershey Special Dark bars that you buy in the bulk candy aisle. It works great, and you can usually buy them on sale for a buck. Also, if you like nuts or chocolate chunks in your brownie, feel free to add them in. I wouldn't add more of 1 cup of add-ins. So if you wanted chunks and nuts, add 1/2 cup each. Or just 1 cup of nuts or 1 cup chunks. Whatever you like. This recipe is just the brownie base, so you can add what you want.
Also, I find that I like the crust on my brownies better when I bake them in an aluminum cake pan. I've tried glass and stone pans, and I like the aluminum best.

Preheat oven to 350. Line an aluminum 13x9 pan with aluminum foil and spray with non-stick spray.

1/3 cup cocoa powder
2 ounces dark chocolate, finely chopped
4 tablespoons butter
1 teaspoon salt
1/2 cup hot coffee
1/2 cup plus 2 tablespoons canola oil
3 large eggs
2 teaspoons vanilla bean paste (or 2 teaspoons extract)
2 1/2 cups sugar
1 3/4 cups all purpose flour

Put cocoa powder, dark chocolate, butter and salt in a large bowl. Pour hot coffee over and whisk until melted. The chocolate won't dissolve all the way into the coffee, no worries. It just needs to melt. Whisk in the oil, eggs, vanilla and sugar. Stir the flour in gently with a rubber spatula until just combined.

Mix in chocolate and/or nuts or whatever else (if you so desire) when you mix in the flour.

Pour brownie batter into your prepped 13x9 pan and bake at 350 for about 30 minutes. You want a toothpick inserted in the middle to come out clean. Oven temps and times can vary so just be sure to check and make sure they're done baking before you take them out.

Allow brownies to cool on a baking rack in the pan for 90 minutes. Run a butter knife around the edge of the pan before taking brownies out. Then turn the brownies upside down onto a cutting board. Cut into desire size with a serrated knife (if you have one, if you don't just be careful) using a sawing motion.

I have no idea where my brownie picture went.. I will have to find it and post it later. Until then, you have to trust me!!

A Note About Vanilla Bean Paste

Seriously, buy this stuff. If you only bake cookies, buy this stuff.. if you bake every day, buy this stuff.

It will change your life. It gives everything you add it to an amazing flavor. Even if you just put a teaspoon in a milkshake or your coffee... I should work for these people since I love this product so much. I gave it to my sister for her wedding present!!!

You can buy a 32 ounce bottle on Amazon for like $35. At a dollar an ounce, it's cheaper than poor quality extract at the grocery store.

Here's the link to where I get mine. And the seller includes a small tin of their mints with your purchase. Cute touch.


Brownie-Cookie Hybrid

I made these this morning, and holy moly. They are good!!

Notes: this is my cookie recipe and brownie recipe put together. So if you wanted to make just the cookie or just the brownie part, you can.This is also a massive recipe. I made these in a 12x16 cake pan. So it yields 48 2 inch brownies. This should be no problem for my husband! If you wanted to cut the recipe in half, it's fairly easy. I would suggest baking a half recipe in a 9x13 pan.
For the dark chocolate in the brownie half, I use those large Special Dark Hershey bars that you buy in the candy aisle. They're like 4.25 ounces, so you only need half a bar for the brownie recipe. Also, if you don't own vanilla bean paste, just use good vanilla extract.

Important prep: in order for proper pan removal, simply line your baking pan with aluminum foil and spray with non stick spray.
Preheat oven to 350

Cookie Half:
3/4 cup unsalted butter, melted
1 cup brown sugar
1/2 cup granulated white sugar
1 teaspoon salt
2 teaspoons vanilla bean paste
2 large eggs
1 teaspoon baking powder
1/2 teaspoon baking soda
1 cup all purpose flour
1 cup bread flour
12 ounces chocolate chips
Mix butter and sugars and salt together. Then add the vanilla and eggs. Next mix in the baking powder and baking soda. Finally, mix in the flours and chocolate chips

Brownie Half:
1/3 cup cocoa powder
2 ounces dark chocolate, finely chopped
1/2 cup hot coffee
4 tablespoons unsalted butter, melted
1 teaspoon salt
1/2 cup plus 2 tablespoons canola oil
3 large eggs
2 teaspoons vanilla bean paste
2 1/2 cups granulated white sugar
1 3/4 cups all purpose flour

Put cocoa powder and chocolate into a bowl and pour hot coffee over chocolate. Mix until melted (chocolate won't dissolve into coffee all the way, no worries) Next, add the butter, salt, canola oil, eggs, vanilla and sugar. Whisk until well combined. Mix flour in with rubber spatula until just combined.

In your aluminum lined and non stick sprayed pan, pour your brownie batter in and spread to the edges. Next, dollop the cookie batter all over the brownie batter. Take a butter knife and swirl through the brownie and cookie batters, mixing them together slightly.

Bake at 350 for 40 minutes. You want a toothpick inserted to come out dry. (For a half recipe, bake 30-35 mins)

This is the hard part : allow them to cool on a baking rack for 90 minutes!! these brownies will still be chewey when cooled down, no need to rush into the pan prematurely. When cool, run a butter knife around the outside of the pan. Turn the brownies upside down onto a cutting board. Carefully peel the aluminum foil off the brownies. Cut into 2 inch squares. (Use a serrated knife if you have one)

Ok.. now you can eat them.. :)


Chocolate Chip Cookies

This seems like kind of a funny recipe to post first, but I'm so tired of seeing sad, burnt flat, dry cookies. I have made tons of cookies in my day and I still love a classic chocolate chip cookie. And in my opinion, these are the best. No fuddy duddy weird ingredients. Just simple, good cookies.
A little bit about why I think this recipe works the best: the melted butter absorbs the sugar well, and keeps the mixture moist so when you mix in the flour, you're less likely to overwork the batter. The bread flour has more gluten than all purpose so it gives the cookies more chew. The vanilla bean paste (I should write a post about that in itself) has such a fantastic flavor, you really can't go wrong. Also, I have no idea why.. but when you bake cookies on parchment paper, they always come out better... always. And yes, it's a pricey product. But it's worth it.. just buy the parchment paper. And you can use parchment over and over. when you're done baking, fold it back up and use the paper again. I usually start fresh after 4 or 5 batches of cookies. Ok, that's enough about parchment paper... ha!

Also, you will want to chill the dough slightly before baking. Cold cookies for some reason bake better.

Here's the recipe:
3/4 cup unsalted butter, melted
1 cup light brown sugar, packed
1/2 cup granulated white sugar
1 teaspoon salt
2 teaspoons vanilla bean paste
2 large eggs
1 teaspoon baking powder
1/2 teaspoon baking soda
1 cup all purpose flour
1 cup bread flour
12 ounces chocolate chips

Mix butter, sugars and salt. Add vanilla and eggs and mix until well incorporated. Mix in baking powder and baking soda. Finally, mix in flours and chocolate chips.

Refrigerate dough for 20 minutes.

Drop by 1 tablespoon onto parchment paper lined baking sheets about 2 inches apart. Bake for 10 minutes at 350.

Share The Love - The Introduction

for my first post, i will share why i am here. i personally believe that life is way too short to eat sub par food and settle for recipes that are either incomplete or not quite there. i do not know everything and i do not claim to know everything, but i know some pretty good tips, tricks, recipes and ideas that can make a difference. so i hope that you can enjoy this blog.. and please, if you have any requests, questions, ideas, suggestions... ect... please share!!